Guide · Numbers
Numbers: Where a Call Coming In Goes Next
A number is the line that brings calls from the outside world into the PBX. This guide goes over everything you can set for it: the three routing layers that decide where the call goes next, what the person receiving it sees, filtering and restrictions, fax, audio files and every advanced field — and finally, buying and deleting a number. You can read it in order, or jump straight to the setting you are looking for.
What a number is, and how it differs from an extension
A number is the line that brings calls in from the outside world. It is the number you publish and that customers dial. It is not a phone and does not sit with anyone. It is an entry point into the PBX, and what you set for it is where the call goes from there.
- Number — from the outside in. It has a destination: an IVR menu, a queue, a hunt group, an extension, or another number.
- Extension — a line for a person in the organization. Calls end up there, and it is the one that rings. There is a separate guide for it.
Every number also has a nickname that you set, such as "Main Line" or "Collections Department," and it appears everywhere in the control panel instead of just digits.
The Numbers screen
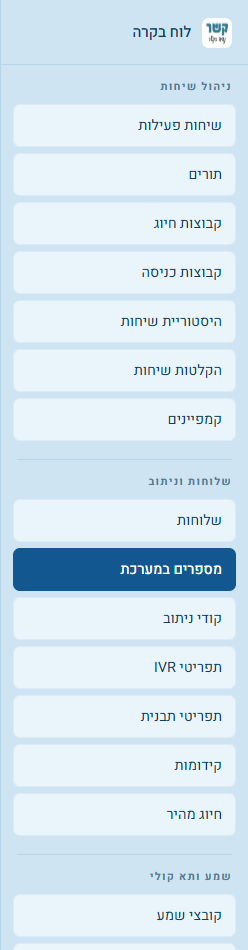
In the control panel, in the side menu, click System Numbers (in the "Extensions and Routing" group). If you do not see the item, you do not have permission to view numbers.
At the top are three counts: how many numbers the account has, how many of them are recorded, and how many of them hang up the call — a number that hangs up is usually an old line that is no longer in use, and it is worth checking that this is really what you wanted.
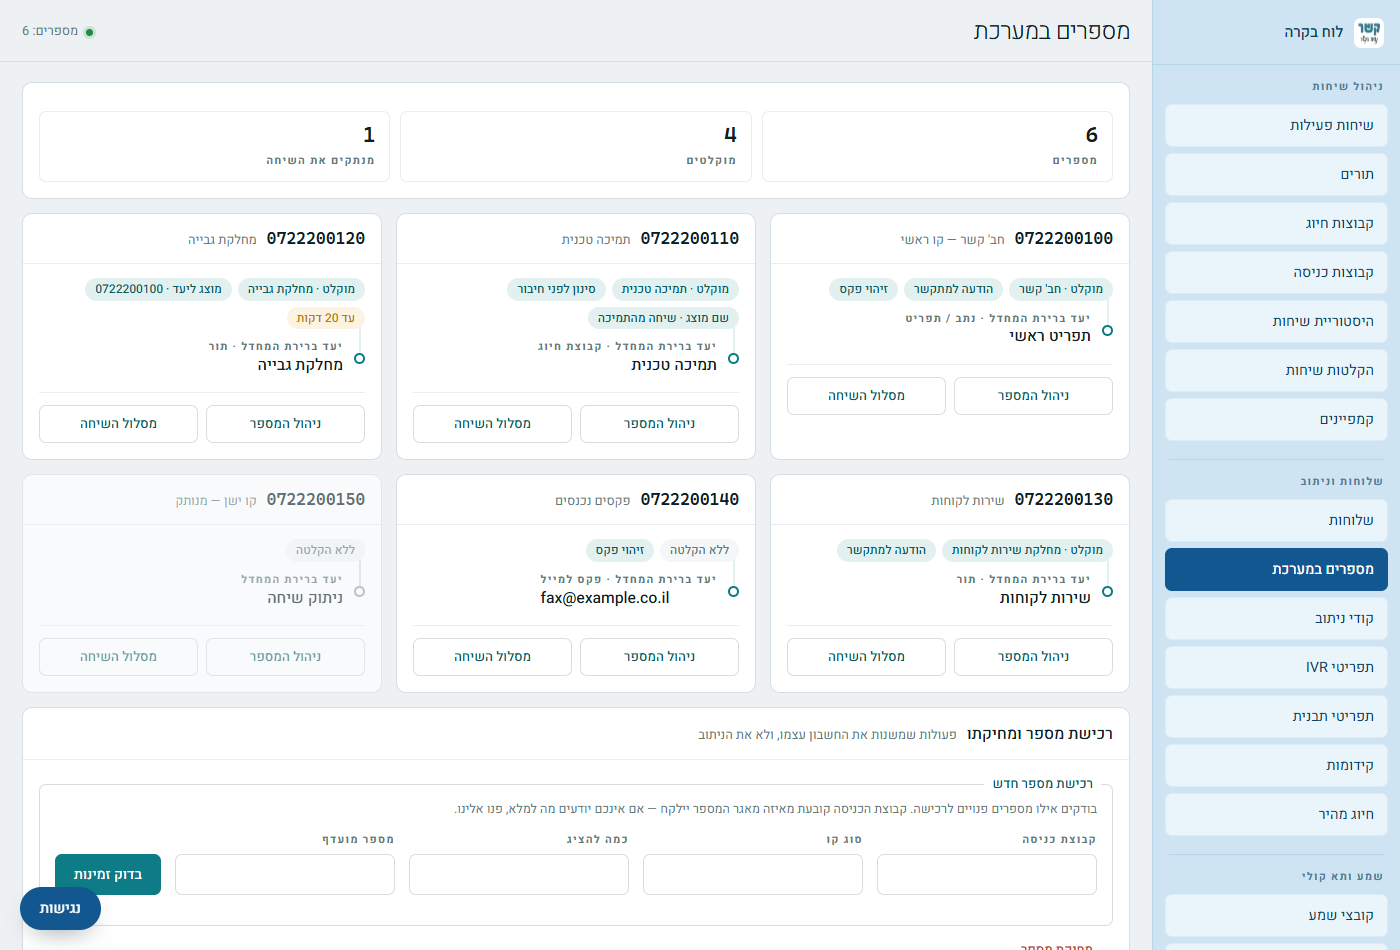
Above the cards is a toolbar: Search the list, switching between Cards and Table view, Sort, and Filter by column. The table shows the number, the nickname, the tags, the default destination and the destination type.
Each card answers two questions: what is set on the number, and where a call goes from it.
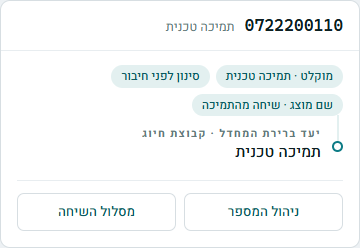
- The digits and the nickname — the number itself, and below it the name you gave it ("No nickname" if there is none).
- The chips — first the recording: "Recorded" and the name of the recording group, or "Not recorded". After it, only what differs from the default: message to caller, screening before connecting, what is displayed to the destination, display name, call length limit and fax detection.
- The default destination — where a regular call goes next, and the destination type. This is the line at the bottom of the card.
At the bottom of the card:
- Manage Number — opens the editor. It appears for users with edit permission for numbers.
- Call Route — shows the whole path the call takes: from the number, through the IVR menu, to whoever actually answers.
- Delete — deletes the number from the account (step 17).
- Link — copies a direct link to the number. Whoever opens it reaches the number after signing in, according to their permissions.
Order of precedence: three layers
This is the important part of the guide. When a call arrives, the PBX does not look at just one destination. It checks three layers in order, and stops at the first one that applies:
| Layer | When it applies |
|---|---|
| 1. Who is calling | The caller's number matches one of the rules you set, for example anyone calling from 03, or specifically anyone calling from a blocked number. |
| 2. When they call | The time the call arrived falls in one of the time groups you set, for example "Evening and night." |
| 3. Default | No other rule applied. This is the destination used for most calls. |
"Manage Number" opens the editor. At the top are the nickname and the number, and next to them the number's recording group (or "None"). Below them is the Order of decision panel, which shows the three layers of this number in their current state, so you do not have to guess:

The default destination
This is the first setting in the form, because it is the one used for most calls. First choose the Destination type, and then The destination itself from a list.
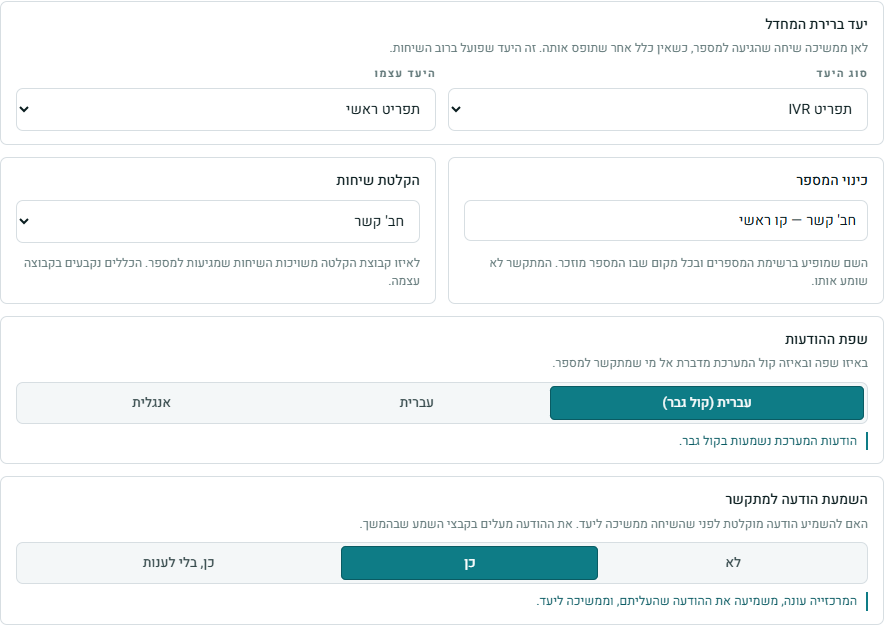
These are the destination types that are actually used:
| Destination type | When to choose it |
|---|---|
| IVR menu | The caller hears a menu and chooses where to go. The most common destination for a main line. |
| Queue | The caller waits until an agent becomes available. Suited to a busy call center. |
| Hunt group | Rings several people, in stages, until someone answers. |
| Extension | Straight to one person. Suited to a direct line. |
| Voicemail | The caller leaves a message without ringing anyone. |
| External Number | The call goes out, for example to a mobile phone. You type the number in the field. If the number you typed is itself one of your numbers or routing codes in the PBX, the call does not go out — it continues according to that number's or code's routing. |
| Fax to Email | A dedicated fax number. You type an email address in the field. |
| Hang up | The call ends. Suited to a line that is no longer in use. |
For a destination type that has no specific destination — for example, Hang up — the "The destination itself" field disappears. Next to a selected destination, Edit Destination appears (step 14).
Routing by the caller's number
The first layer, and the strongest — in the "1. Routing by caller number" panel. Here you set different routing for someone who calls from a specific number or a specific prefix.
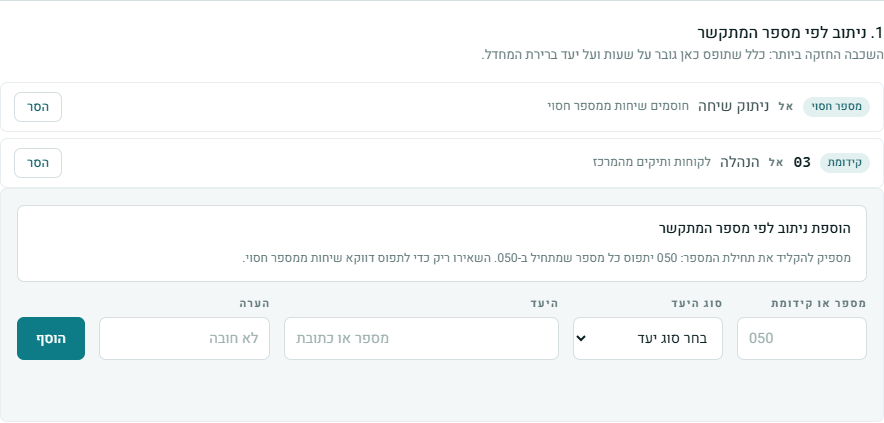
In the add row, fill in Number or prefix, Destination type, Destination and Note (optional), and click Add. In the "Number or prefix" field you type the beginning of the number; it does not have to be a full number:
- 050 matches any number that starts with 050, meaning that entire mobile network.
- 03 matches any number from the central area (area code 03).
- 0501234567 matches exactly one number.
- Empty specifically matches calls coming from a blocked number, meaning with no caller ID. This is how you block them: set an empty rule whose destination is "Hang up."
In the list, a rule with digits is marked "Prefix", and an empty rule "Withheld number". The "Note" is for you only — it is worth writing why the rule exists, because in six months you will not remember. To remove a rule, click Remove.
There is also a separate service for blocking spam numbers and unwanted lines across the whole PBX — see the Call filtering guide.
Routing by time
The second layer, in the "2. Routing by time" panel: a different answer at different hours. Here you set, for example, that during business hours the call goes to a queue, and in the evening to voicemail.
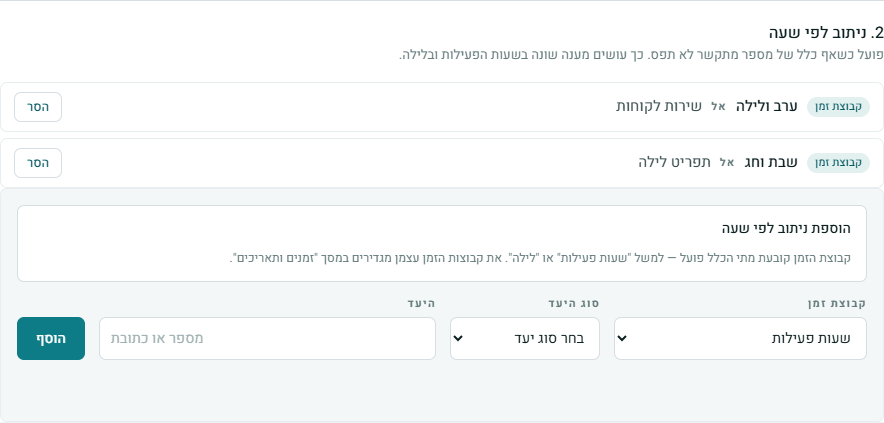
Each rule is made of a time group and what happens in it. A time group is a setting in its own right, such as "Business Hours," "Evening and Night," or "Shabbat and Yom Tov." You define it once on the Times and Dates screen. The same group is then used across all your numbers.
- Each time group can be assigned only once to the same number. A group that is already in use will not appear in the add list, and when all of them are in use it says "No time group available".
- A time that is not in any time group: the call continues to the default destination.
- There is no need to define all the hours of the day. It is enough to define the exceptions.
The basic settings
Four settings below the default destination:
| Setting | What it does |
|---|---|
| Number nickname | The name that appears in the numbers list and everywhere the number is mentioned. The caller does not hear it. It is worth choosing a name that says what the line is used for, such as "Main Line — Sales." |
| Call recording | Which recording group the calls arriving at the number belong to, or "Not recorded". The rules — what is recorded, what percentage, and how long it is kept — are set in the group itself, on the Call recordings screen. |
| Message language | The language and voice the system uses when speaking to someone who calls the number: Hebrew (male voice), Hebrew, or English. |
| Play a message to the caller | Whether to play the caller a recorded message even before the PBX dials the destination — for example "Transferring you to the extension 4 agents", so the caller knows they reached the right place. The message itself is uploaded in the audio files (step 11). |
"Play a message to the caller" has three options, and the difference between them matters:
- No — the call continues to the destination with no message.
- Yes — the PBX answers, plays the message, and continues to the destination.
- Yes, without answering — the message plays while the call is ringing, without the call being answered. Suited to a short message that you do not want counted as an answer.
All the other settings are under Advanced Management: caller identification, screening, call limit, fax and ownership. Click the row to open it.

What the person receiving the call sees
By default, the destination sees the caller's number, which is usually what you want. But you can replace it, for example so that an agent knows which line the call came through before answering.
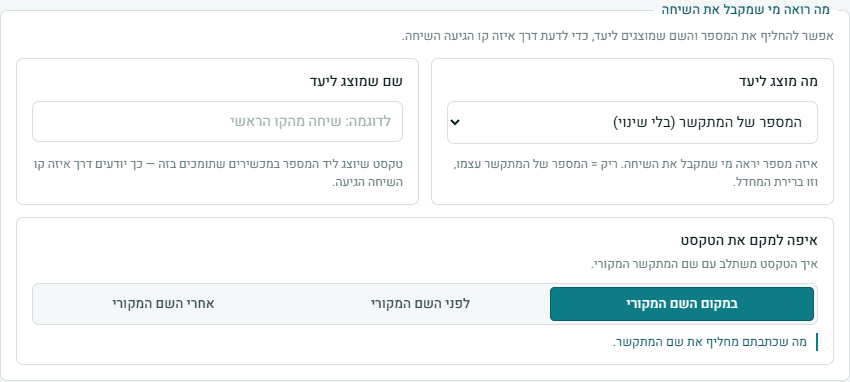
| Setting | What it does |
|---|---|
| What is displayed to the destination | Which number the person receiving the call will see. "The caller's number (unchanged)" is the default. You can choose one of your numbers instead. |
| Name displayed to the destination | Text that is shown next to the number, on devices that support it. For example, "Call from Support." |
| Where to place the text | Instead of the original name, before the original name, or after the original name. |
Filtering and restrictions
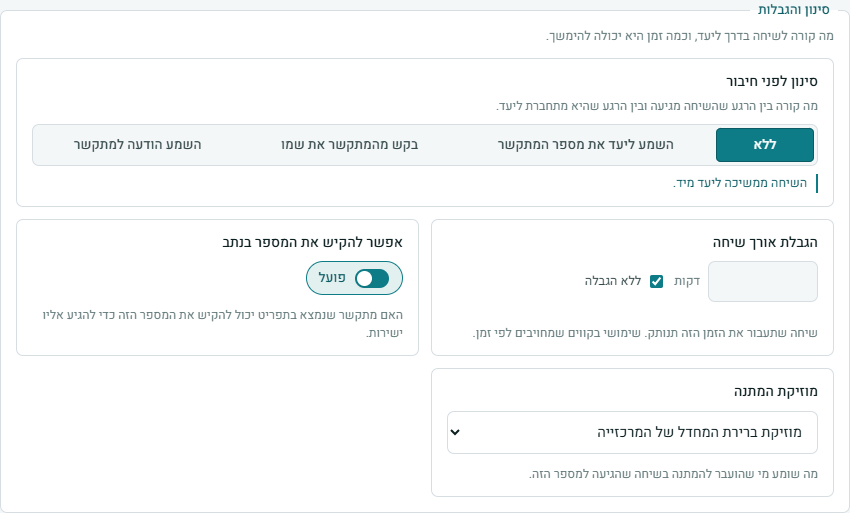
Screening before connecting
What happens between the moment the call arrives and the moment it connects to the destination:
| Option | What happens |
|---|---|
| None | The call continues to the destination immediately. This is the default. |
| Announce the caller's number to the destination | Whoever answers hears which number the call came from, before it connects. |
| Ask the caller for their name | The caller records their name, and whoever answers hears it before the connection. |
| Play a screening message to whoever answers | Whoever answers hears the message you uploaded to the "Message to recipient" file (for example "A call from the donations line"), so they know how to answer. Meanwhile the caller waits on the line and is not yet connected. |
Other settings in the group
| Setting | What it does |
|---|---|
| Call length limit | A call that goes over this time is disconnected. Set in minutes, at least 1 minute; the "Unlimited" checkbox cancels the limit, and that is the default. Useful on lines that are billed by time. |
| Can be dialed in the IVR menu | Whether a caller who is in a menu can dial this number to reach it directly. |
| Hold music | What someone hears when they are put on hold during a call that arrived at this number. |
Fax
A fax call sounds different from a regular call, and the PBX can recognize the sound and send it to a different destination, without anyone having to answer.
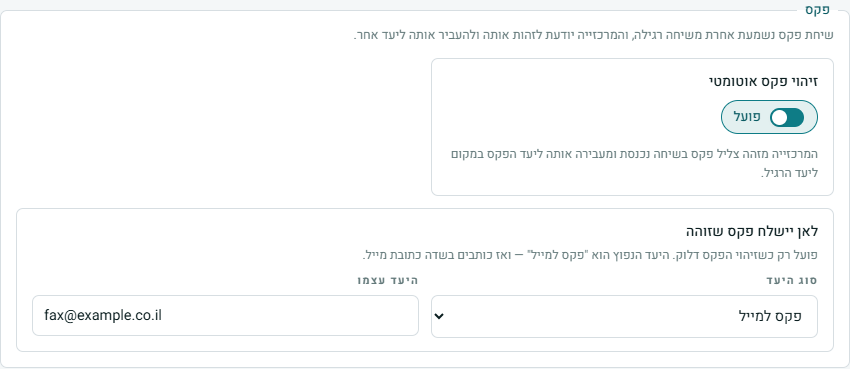
Turn on Automatic fax detection, and choose Where a detected fax is sent. The most common destination is Fax to Email — then you type an email address in the destination field, and every fax that arrives is sent to it as a file.
The number's audio files
The "Number audio files" panel is closed when the editor opens — click its title to open it. A number has two audio files, and each of them is turned on by a different setting:
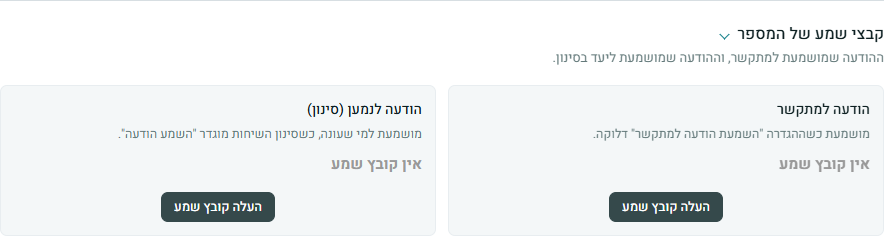
- Message to caller — the caller hears it before the PBX dials the destination, when the "Play message to caller" setting is on (step 7).
- Message to recipient (screening) — whoever answers hears it before the call connects (the caller waits meanwhile), when call screening is set to "Play a screening message to whoever answers" (step 9).
When there is a file, it says "Audio file exists", with Play, Download, Delete and Replace next to it. When there is none, it says "No audio file" with Upload Audio File. A recording without the matching setting will not play — you need both.
Automatic transcription and call filtering in the editor
Below the audio files are two more panels, each with its own guide:
- Automatic transcription to email — every recorded call on this number is transcribed and sent by email. Available only for a recorded number, and only to users with permission. See the Transcription guide.
- Call filtering service — joining the number to the filtering of spam and unwanted lines. See the Call filtering guide.
Call route — from every screen, and jumping to the setting
At the bottom of the editor, next to Save Changes, is Call Route. You can open the diagram not only from a number: the button is also on the card of an extension, a code, an IVR menu, a queue and a hunt group, and inside their edit screens as well. It is the same diagram everywhere — only the starting point is the item you opened it from.
For an entity with no further routing, such as an extension, the diagram shows the entity itself and the Arriving here panel: every route in the system that leads to it. This is the quick way to answer "what even points to this extension."
At the top of every box in the diagram is Go to Settings. It opens the settings screen of that entity in a pop-up window over the diagram, so you can fix something and return to the route without losing your place. At a final stop that is an extension, the button appears inside the box.
Creating a new destination and editing the destination, while choosing a destination
Creating a new destination
Wherever you choose a destination — default destination, caller route, time route, IVR menu key, destination in a group — the list of destinations ends with the option Create New IVR…, Create New Queue… or Create New Hunt Group…, depending on the type you chose.
- Choose a destination type — for example, IVR menu.
- In the list of destinations, choose the last row, Create New IVR….
- Type a name and confirm. The entity is created immediately and is selected automatically as the destination.
- You are asked whether to open its settings now. This is where you fill in what is missing, for example the keys in an IVR menu or the agents in a queue.
- Go back and click Save. The entity has been created, but the link to it is only saved when you save.
Edit Destination
When the selected destination has a settings screen — an IVR menu, queue, hunt group, extension, voicemail box and so on — Edit Destination appears next to it. It opens the destination's settings in a window above the form, without leaving it. After you save in the top window, it closes on its own, and you return to the number's form with the updated name already in the list.
Ownership, fixed fields and saving
Ownership and access
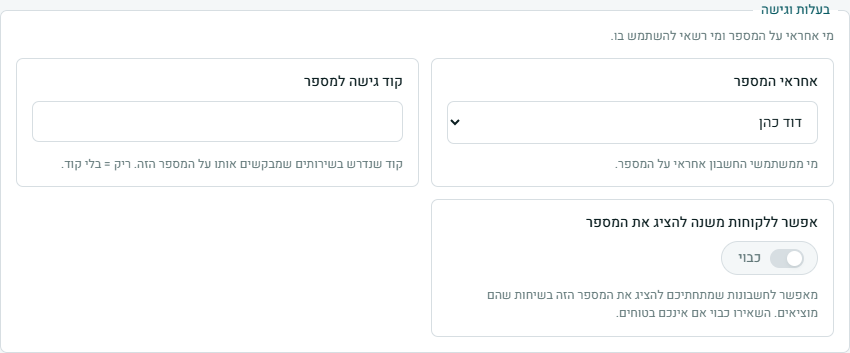
| Setting | What it does |
|---|---|
| Number owner | Which of the account's users is responsible for the number, or "No owner". |
| Number access code | A code required by services that ask for one on this number. Empty = no code. |
| Allow sub-customers to display the number | Lets accounts under yours display the number on calls they make. Leave it off if you are not sure. |
What is fixed by the PBX
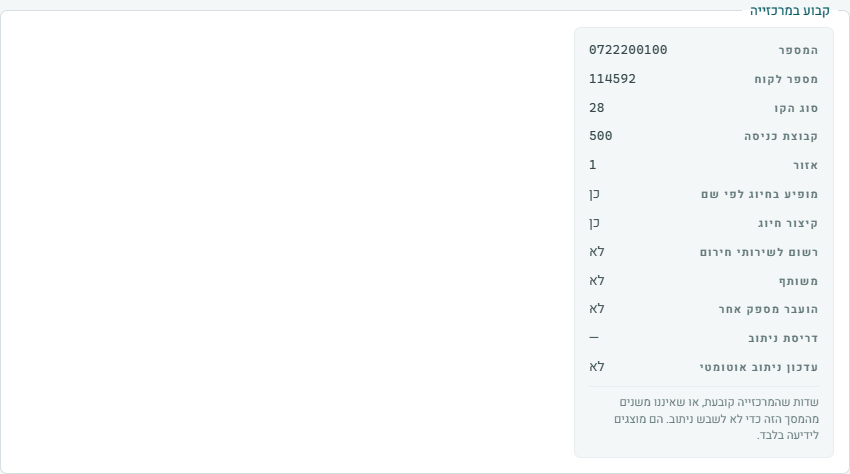
At the end of "Advanced Management" there is a group, Fixed in the PBX: fields that the PBX sets, or that we do not change from this screen so as not to disrupt routing — the number itself, the customer number, the line type, the ingroup, the region and more. They are shown for information only.
Saving and permissions
- Save Changes sends to the PBX only the settings you actually changed. A field you did not touch is not written again.
- Routing rules (layers 1 and 2) are saved immediately when you click Add or Remove. They do not wait for the Save button.
- If you close the window with an unsaved change, you will be asked before the change is lost.
- Editing requires edit permission for numbers, buying requires create permission, and deleting requires delete permission. Without the permission, the matching button does not appear.
Buying a number
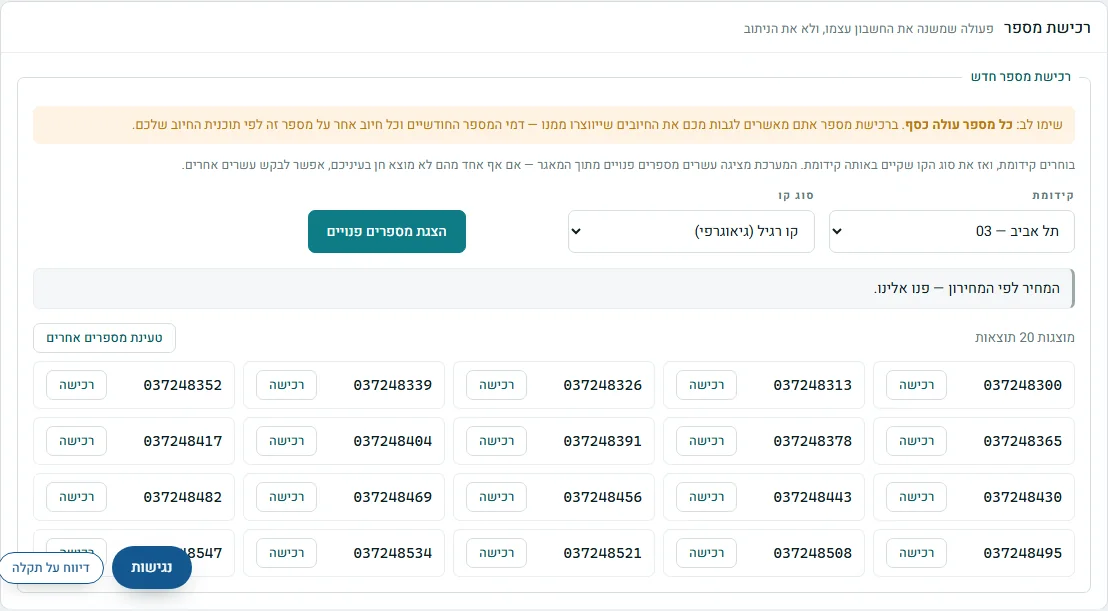
At the bottom of the Numbers screen there is a separate card, Buy a Number — an action that changes the account itself, not the routing. Buying takes a few steps:
- Choose a prefix — a line by area (02 Jerusalem, 03 Tel Aviv and so on), a mobile prefix (050, 051, 052, 053, 054, 055, 058, or "Mobile — SMS only"), or a 1XXX number (1800, 1700, 1599). Want to bring over a number you already have? That is not a purchase but porting — see the porting guide.
- Choose a line type — the list is filled according to the prefix you chose, so you cannot choose a combination that does not exist. The price appears below the row: a one-time purchase fee and the number fee (per month, or per billing period), before VAT. A line type that has no price in the price list cannot be purchased from here — it says there to contact us. When the price is not available right now, a number cannot be purchased until it is back — try again in a few minutes.
- Click Show Available Numbers. Twenty results are shown, each with Buy next to it. If none of the numbers appeals to you, Load Other Numbers brings twenty other numbers from the pool — and at the end of the list it starts again from the beginning.
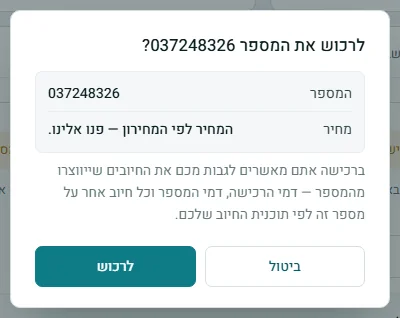
- Confirm — clicking "Buy" opens a "Buy the number?" window with the number, the price and the warning about the charges. Only Buy completes the purchase; Cancel closes it without buying. After the purchase, the number appears in the list.
Deleting a number
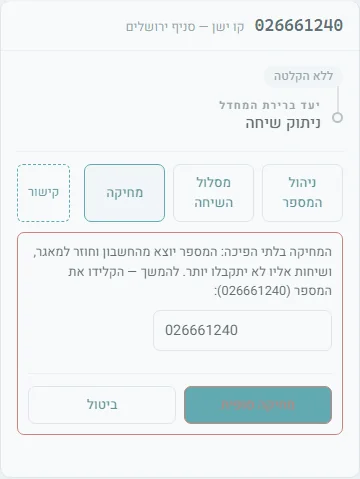
The Delete button is on the card of every number. It does not delete right away: a warning opens inside the card, with a field where you type the number itself. Only after you type it correctly does Delete Permanently delete it. Cancel closes the warning.
Stuck? Does something on the screen not behave like in the guide? Write to us through the Contact Us page. We'll be glad to help, and also to hear what's missing from the guide.